CentOS下怎么安装xen虚拟机
相关话题
从RHEL6版本开始,RedHat就不在原生支持Xen,改为投奔KVM的怀抱。那么大家知道CentOS下怎么安装xen虚拟机吗?今天小编与大家分享下CentOS下安装xen虚拟机的具体操作步骤,有需要的朋友不妨了解下。
CentOS下安装xen虚拟机方法
centos 6.5 64位操作系统安装xen
注意:virtualbox下安装centos时注意磁盘空间,要不然会提示磁盘空间不足
WARNING The filesystem will not have enough freespace to fully allocate the sparse
file when the guest is running. 3072 Mrequested > 310 M available
ERROR The filesystem will not have enough freespace to fully allocate the sparse
file when the guest is running. 3072 Mrequested > 310 M available (Use --prompt or
--force to override)
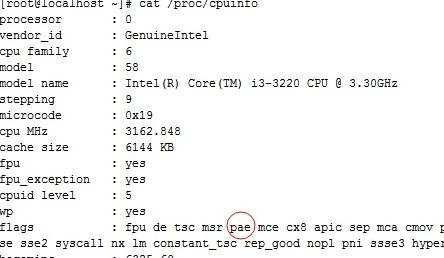
如果看到输出中有pae,那么cpu就支持半虚拟化,如果输出中同时有pae和vmx/svm(注:vmx为intel,svm为amd),那么cpu支持全虚拟化
第一:
将Xen4CentOS资料库连接到你的机器,以便安装可以轻松完成。要做到这一点,请输入:
yum install centos-release-xen
第二:现在已经将Xen4CentOS资料库添加到yum系统,接下来安装xen
yum install xen
第三:加载了虚拟机管理程序软件。现在,我们需要新的内核添加到GRUB菜单。要做到这一点,执行脚本:
/usr/bin/grub-bootxen.sh
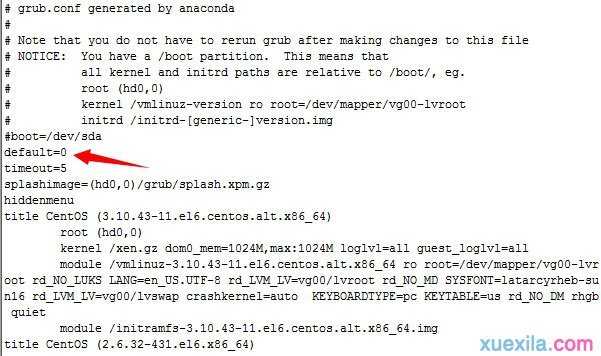
查看/boot/grub/grub.conf应该会有这样的条目
title CentOS (3.10.43-11.el6.centos.alt.x86_64)
root(hd0,0)
kernel/xen.gz dom0_mem=1024M,max:1024M loglvl=all guest_loglvl=all
module/vmlinuz-3.10.43-11.el6.centos.alt.x86_64 roroot=/dev/mapper/vg00-lvroot rd_NO_LUKS.UTF-8 rd_LVM_LV=vg00/lvrootrd_NO_MD SYSFONT=latarcyrheb-sun16 rd_LVM_LV=vg00/lvswap crashkernel=auto KEYBOARDTYPE=pc KEYTABLE=us rd_NO_DM rhgbquiet
module/initramfs-3.10.43-11.el6.centos.alt.x86_64.img
第四:如果查看/boot/grub/grub.conf,default=1,则将default=0默认支持xen的内核启动

第五:重启系统,重启完成后,查看当前内核

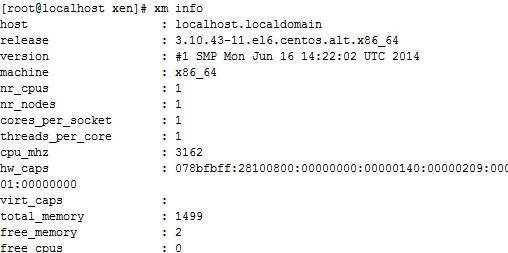
第六:xen安装完成,执行xm info 查看相关信息。
uname-r
xm info
第七:安装libvirt 和virt-manager:
[root@localhost ~]#yum install libvirtvirt-manager
启动libvirt
[root@localhost ~]# libvirtd –d
第八:开始安装xen虚拟主机准备工作(利用命令行安装xen虚拟机)
1、安装apache,在apache根目录下创建tree目录,并创建/data
[root@localhost xen]# yum install httpd
[root@localhost ~]# service httpd start
[root@localhost xen]# cd /var/www/html/
[root@localhost html]# mkdir tree
[root@localhost ~]# mkdir /data
2、将centos的镜像文件ftp上传到/data目录下

3、将centos镜像文件挂载到/var/www/html/tree/下
[root@localhost ~]# mount -o loop/data/CentOS-6.5-x86_64-bin-DVD1.iso /var/www/html/tree/
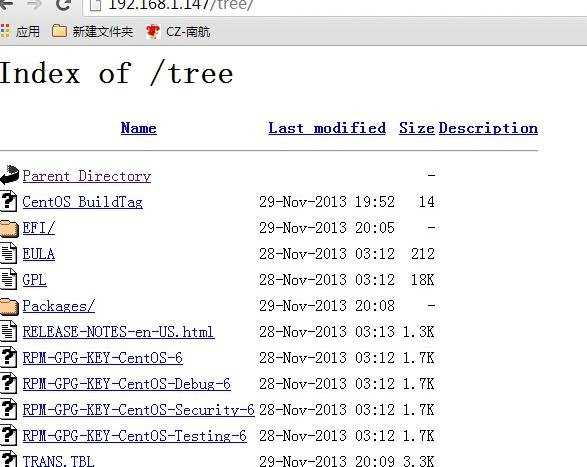
在浏览器下查看,这样表示成功挂载:
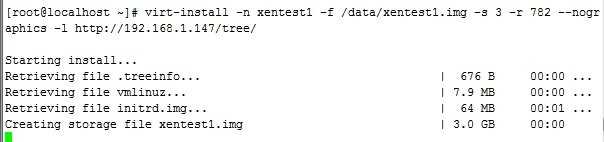
第九:开始用命令行创建虚拟机
[root@localhost ~]# virt-install -nxentest -f /data/xentest.img -s 3 -r 782 --nographics -l //192.168.1.147/tree/
-n 指定创建虚拟机的名称
-f 作为磁盘映像使用的文件
-s 磁盘映像的大小,单位为G
-r 指定内存的大小,单位为M
--nographics 表示不安装图形控制台
-l 安装的源
然后根据系统提示安装系统,使用文本模式安装,安装过程跟真实机一样,虚拟机的配置文件存放在
/etc/xen下面
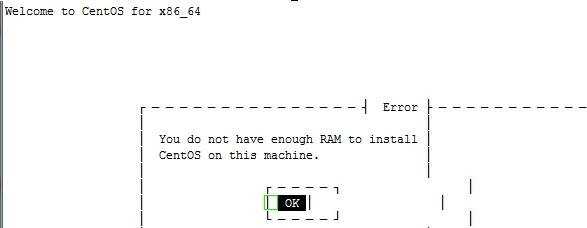
提示:当我指定内存-r 384时
安装过程中提示内存不足:You do nothave enough RAM to install ││ CentOS on this machine.
第十:安装完成后,查看真实机上的虚拟机列表

第十一:连接到安装好的xentest虚拟控制台,并输入用户名和密码
[root@localhost ~]# xm console xentest
附相关操作命令:
ls /etc/xen #xen配置文件目录
xm list #查看各个域状态
xm shutdown xentest #关闭xentest这个虚拟机
xm start xentest #启动xentest这个虚拟机
xm console xentest 连接xentest控制台,连接到虚拟机上面可以用组合键 ctrl + ] 键切换到物理机